2013年12月24日火曜日

Gap between asm.js and native performance gets even narrower with float32 optimizations

asm.js is a simple subset of JavaScript that is very easy to optimize, suitable for use as a compiler target from languages like C and C++. Earlier this year Firefox could run asm.js code at about half of native speed – that is, C++ code compiled by emscripten could run at about half the speed that the same C++ code could run when compiled natively – and we thought that through improvements in both emscripten (which generates asm.js code from C++) and JS engines (that run that asm.js code), it would be possible to get much closer to native speed.

Since then many speedups have arrived, lots of them small and specific, but there were also a few large features as well. For example, Firefox has recently gained the ability to optimize some floating-point operations so that they areperformed using 32-bit floats instead of 64-bit doubles, which provides substantial speedups in some cases as shown in that link. That optimization work was generic and applied to any JavaScript code that happens to be optimizable in that way. Following that work and the speedups it achieved, there was no reason not to add float32 to the asm.js type system so that asm.js code can benefit from it specifically.

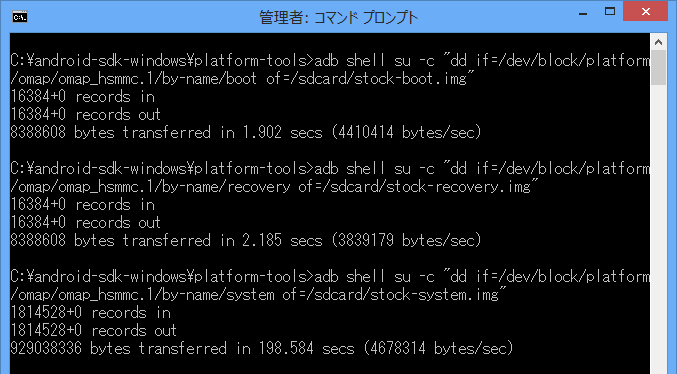
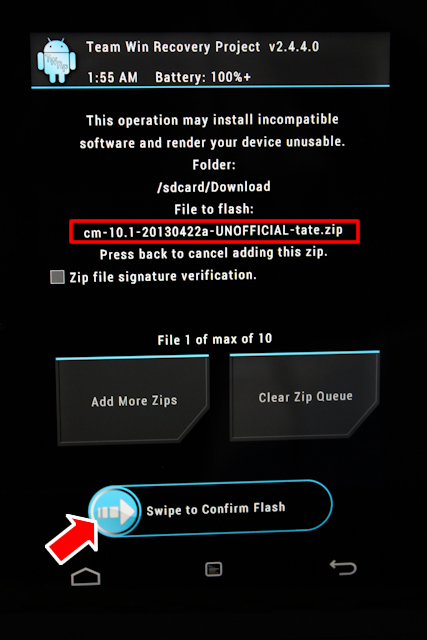
The work to implement that in both emscripten and SpiderMonkey has recently completed, and here are the performance numbers:

asm1.5b

Run times are normalized to clang, so lower is better. The red bars (firefox-f32) represent Firefox running on emscripten-generated code using float32. As the graph shows, Firefox with float32 optimizations can run all those benchmarks at around 1.5x slower than native, or better. That's a big improvement from earlier this year, when as mentioned before things were closer to 2x slower than native. You can also see the specific improvement thanks to float32 optimizations by comparing to the orange bar (firefox) next to it – in floating-point heavy benchmarks like skinning, linpack and box2d, the speedup is very noticeable.

Another thing to note about those numbers is that not just one native compiler is shown, but two, both clang and gcc. In a few benchmarks, the difference between clang and gcc is significant, showing that while we often talk about "times slower than native speed", "native speed" is a somewhat loose term, since there are differences between native compilers.

In fact, on some benchmarks, like box2d, fasta and copy, asm.js is as close or closer to clang than clang is to gcc. There is even one case where asm.js beats clang by a slight amount, on box2d (gcc also beats clang on that benchmark, by a larger amount, so probably clang's backend codegen just happens to be a little unlucky there).

Overall, what this shows is that "native speed" is not a single number, but a range. It looks like asm.js on Firefox is very close to that range – that is, while it's on average slower than clang and gcc, the amount it is slower by is not far off from how much native compilers differ amongst themselves.

Note that float32 code generation is off by default in emscripten. This is intentional, as while it can both improve performance as well as ensure the proper C++ float semantics, it also increases code size – due to adding Math.fround calls – which can be detrimental in some cases, especially in JavaScript engines not yet supporting Math.fround.

There are some ways to work around that issue, such as the outlining optionwhich reduces maximum function size. We have some other ideas on ways to improve code generation in emscripten as well, so we'll be experimenting with those for a while as well as following when Math.fround gets supported in browsers (so far Firefox and Safari do). Hopefully in the not so far future we can enable float32 optimizations by default in emscripten.

Summary

In summary, the graph above shows asm.js performance getting yet closer to native speed. While for the reasons just mentioned I don't recommend that people build with float32 optimizations quite yet – hopefully soon though! – it's an exciting increase in performance. And even the current performance numbers – 1.5x slower than native, or better – are not the limit of what can be achieved, as there are still big improvements either under way or in planning, both in emscripten and in JavaScript engines.

2013年11月23日土曜日

Google is building a Chrome app-based development environment called Spark

Google's Chromium team never ceases to amaze. Its latest project is a Chrome app-based Integrated Development Environment (IDE) codenamed Spark.

The new app was first noted by developer and Google open-source Chromium evangelist Francois Beaufort. Here are his observations for the new IDE project:

  • It is built with Dart, the "new language for scalable web app engineering".
  • It contains a GUI widgets library powered by Polymer
  • It's public on GitHub and therefore interesting for anyone who wants to know how Dart and Polymer can be used to build the next generation of Chrome Apps.

Here is the progress so far:

For those who don't know, Chrome packaged apps are written in HTML, JavaScript, and CSS, but launch outside the browser, work offline by default, and access certain APIs not available to Web apps. In other words, they're Google's way of pushing the limits of the Web as a platform.

Dart meanwhile is Google's open-source Web programming language, which has an ultimate goal of replacing JavaScript. Polymer is Google's library for the Web, built on top of Web Components, and "designed to leverage the evolving web platform on modern browsers."

It's not clear if Google will actually support this Chrome App and update it on a regular basis when it's done, or it will be simply used as an example to show what is possible with the aforementioned technologies. We're leaning towards the former, but given how often Google cans projects, you never know.

You can check out the IDE and widgets user interface separately over here andhere. Clearly there is still a lot of work to be done, but then again, this is a massive undertaking.

2013年11月14日木曜日

日本通信、データ通信SIMの価格競争に終止符を打つと宣言

日本通信は13日、"データ通信SIMの価格競争に終止符を打つ"ことを宣言したプレスリリースを公開した。23日より市場投入する、音声サービスの基本料のみでデータ通信が無料となるSIM「スマホ電話SIM フリーData」の価格面でのメリットを強調している。

同サービスは090番でスマートフォンでの音声通話ができるもので、基本料月額1,638円、データ通信(200kbps)は無料で利用できるというもの。高速で利用したい場合には、3GB高速データオプションを1,638円で利用することができる。

同社では、ライトユーザーなら1,638円、レギュラーユーザーでも3,276円で済むとし、「スマートフォンを使う方にとって、一番いい組み合わせの、市場最強のSIMが、スマホ電話SIMフリーDataなのです」とまとめている。

なお、サービスは、Xi、FOMAやSIMフリーのスマートフォンに対応し、SIMは標準、 マイクロ、ナノサイズの全サイズを用意。イオン、ヨドバシカメラ、Amazon.co.jpで23日より販売される。

2013年10月26日土曜日

HTML5 WYSIWYG EDITOR

Raptor EditorTM is an Open Source javascript wysiwyg html editor designed to be user-friendly and easy to integrate and customize. Raptor is designed for inline editing and is ideal for complex multi-block layouts. Raptor utilizes the latest technologies including HTML5 ContentEditable and jQuery features comprehensive built-in unit tests and a modular, extensible codebase and plugin API. For more information See all Features or try the demo.


Google Web Designerとは?

Google Web Deisgnerは、Googleが提供するHTML5用のオーサリングツールだ。現在はまだベータ版ではあるものの、WindowsおよびMacで利用することができる。

同種のオーサリングツールとしてはAdobe Edgeや、Sencha Animetorなどがあるが、これらがいずれも有償製品であるのに対し、Google Web Designerは無償で利用可能だ。また、現時点ではHTML5を使用したオンライン広告を作成するためのツールという方向性を打ち出しており、この点も汎用的なオーサリングツールであるAdoge EdgeやSencha Animatorなどとは異なる部分だ。


インテル、無償のHTML5アプリ開発���境「Intel XDK」を公開。iOS/Android/Kindleなどクロスプラットフォーム���応


インテルは、先週4月10日から11日かけて中国北京で開催された「Intel Developers Forum Beijing 2013」(IDF Beijing 2013)において、クロスプラットフォームに対応したHTML5アプリケーションの開発ツール「Intel XDK」を発表しました。

Intel XDKはブラウザ上で動作するHTML5アプリケーション開発ツール(ChromeブラウザとJavaのインストールが必要)。HTML/CSS/JavaScriptで開発したアプリケーションを、PhoneGap機能でビルドし、iOS/Android/Kindle/Facebookなどのアプリケーションが開発できます。開発したアプリケーションは、各アプリストアで販売も可能。

これは2月にインテルが、jQuery互換のモバイル用ライブラリ「jqMobi」などの開発元であるAppMobiから買い取った一連の開発ツールがベースになっています。

開発したアプリケーションはエミュレーション機能により画面内で試すことができます。エミュレーションではデバイスの向き、接続が3GかWifiか接続なしか、場所はどこかなどを指定できるため、実機を様々な環境に持ち出すことなく動作確認が可能。

実際にインストールして試してみましたが、ファイル名などで日本語表示が欠けるなど、日本語の利用はあまり考慮されてないようでした。

なぜインテルがHTML5を推進するのか?

インテルはIDF Beijing 2013でHTML5へのコミットを強調していました。なぜプロセッサベンダのインテルが、HTML5のような上位レイヤにツールを買収してまでお金をかけてコミットするのでしょうか?

おそらくモバイルデバイス市場での遅れを取り戻すために、インテルはHTML5のようなプラットフォームに依存しないモバイルアプリケーションの開発環境を推進したいのだと思われます。

現在モバイル市場は実質的にアップルのiOSとグーグルのAndroidに二分され、またプロセッサはARMプロセッサが席巻しています。PC市場以上に急速に成長しているモバイル市場で後れをとったインテルは、AtomプロセッサでARMに挑みつつ、モバイルOSではTizenを推進する立場です。

インテルにとって、多くのアプリケーションデベロッパーがiOSやAndroidのネイティブアプリケーションの開発に親しむようになってしまえば、この状況を変えることは一層困難になります。それよりもHTML5のようなクロスプラットフォームに親しんでくれた方が、あとから新しいプロセッサ、新しいOSを普及させようとしたときにアプリケーションの移植が容易で、すぐにアプリケーションを揃えやすい、という利点があります。

だからこそインテルは、モバイルアプリケーションの開発者をプラットフォームから独立したHTML5に親しんでもらうべく、戦略的にHTML5にコミットしているのではないでしょうか。


2013年10月19日土曜日

転ばぬ先の杖 「Factory Cable」なる物を作った

以下内容は冗談抜きでリスクを伴う。ご利用は自己責任で。

何に使うもの?
(「Kindle Fire HD」のレンガ回復に使用)

実は結構そんなのどうでもよくて、作る工程自体が楽しめたりする。


用意するもの
100均(ダイソー)でmicroB USBケーブルを買ってきた。
bbbb01.png

その他必要とおもわれる物
半田コテ、鉄ヤスリ、ハサミ、ニッパー等

やることは1PIN(赤)と使われてない4PINを繋げればOK。
皮むきさえうまくいけば半田付けはそんなに難しくない。
コネクタ外側の黒いカバーはハサミで切込を入れながらニッパーで丁寧に剥がしていく。
半透明なプラスチック部分が見えたら、ヤスリとニッパーで半田付けしたい箇所が見えるように慎重に削っていく。

ホントに慎重にいかないとケーブルごとごそっと逝ってしまう。

半田つけ箇所が露出したら表裏で接続しておわり。

bbbb02.png

Factoryケーブルの使い方は、本体電源を落とした状態で接続すると強制的にfastbootに入る。
この方法自体が対策されない限りは本体レンガになってもfastbootまでは行ける・・・。

faasdf01.png

ケーブルを抜いてリブートすれば通常起動した。

ドライバも問題ないみたいだ。
c:\kindle>fastboot -i 0x1949 reboot
rebooting...

finished. total time: -0.000s


はてさて、はんだこてを握ったのは何年ぶりだろうか。

下手すると本体ぶっ壊れのリスクを伴いながらも、ちまちま作業するのが実に楽しい。

【Kindle Fire HD】カスタムROM(CM10.1)を入れてみる

Kindle Fire HDにカスタムROMのCyanogenMod10.1(CM10.1)を導入しようと思い、

まずはブートローダの書き換えと、リカバリーツールであるTWRPの導入を行いました。

CM10.1はAndroid 4.2ベースのカスタムROMになります。

導入はXDAのフォーラムに記載されている流れ通りです。

最新の導入方法を必ずXDAのフォーラムで確認してください。

この作業にはKindle Fire HDのルート化とAndroidSDK環境が構築されていることが前提です。

 ⇒【Kindle Fire HD】(ルート化 #1) ドライバーをインストールしてパソコンとKindleを認識させる

 ⇒【Kindle Fire HD】(ルート化 #3) ルート化作業の本番

現在使用しているKindleのOSは、Amazonのストックロムで、2013/5/3時点で最新のバージョン7.3.1です。

導入するTWRPのバージョンは2.4.4.0です。

作業は自己責任でお願いします。

adbコマンドを使用するので、

Kindle Fire HDの設定を開き"その他"⇒"セキュリテ"ィから"ADBを有効にする"を"ON"に変更します。

kindle-root-21

KindleとパソコンをUSBケーブルで接続し、コマンドプロンプトを起動します。

最初に現在のブート、リカバリー、システム領域のバックアップを行います。

ddコマンドで、対象の領域をKindleの"/sdcard"フォルダにコピーします。

実際のコマンドは以下のようになります。

2013/05/18追記

新しく"boot0″ブロックのバックアップが追加されています。
同じようにバックアップすることをおススメします。

"boot0″ブロックには端末固有の重要な情報が含まれているようです。
詳細は以下で確認してください。

<ATTN: Backup your boot0 block today>
http://forum.xda-developers.com/showthread.php?t=2274338

1  2  3  
adb shell su -c "dd if=/dev/block/platform/omap/omap_hsmmc.1/by-name/boot of=/sdcard/stock-boot.img"  adb shell su -c "dd if=/dev/block/platform/omap/omap_hsmmc.1/by-name/recovery of=/sdcard/stock-recovery.img"  adb shell su -c "dd if=/dev/block/platform/omap/omap_hsmmc.1/by-name/system of=/sdcard/stock-system.img"

cm10-1-01

pullコマンドで、上の3ファイルをKindleからパソコン側コピーします。

実際のコマンドは以下のようになります。※パソコン側のフォルダは環境にあわせて変更してください。

1  2  3  
adb pull /sdcard/stock-boot.img C:\android-sdk-windows\Rom\CM10.1\Backup\stock-boot.img  adb pull /sdcard/stock-recovery.img C:\android-sdk-windows\Rom\CM10.1\Backup\stock-recovery.img  adb pull /sdcard/stock-system.img C:\android-sdk-windows\Rom\CM10.1\Backup\stock-system.img

cm10-1-02

cm10-1-03

XDAのフォーラムから必要なファイルをダウンロードします。

  1. stack
  2. kfhd7-freedom-boot-7.3.0.img
  3. kfhd7-twrp-2.4.4.0-recovery.img
  4. kfhd7-u-boot-prod-7.2.3.bin

cm10-1-20

pushコマンドで、ダウンロードしたstackファイルをKindleの"/data/local/tmp/"フォルダにコピーします。

実際のコマンドは以下のようになります。※パソコン側のフォルダは環境にあわせて変更してください。

1  
adb push C:\android-sdk-windows\Rom\CM10.1\stack /data/local/tmp/

cm10-1-05

ddコマンドで、stackファイルをsystem領域にブロックサイズ指定でコピーします。

実際のコマンドは以下のようになります。

1  
adb shell su -c "dd if=/data/local/tmp/stack of=/dev/block/platform/omap/omap_hsmmc.1/by-name/system bs=6519488 seek=1"

cm10-1-06

Kindleに存在する"install-recovery.sh"のファイル名を"install-recovery.sh.bak"に書き換えます。

実際のコマンドは以下のようになります。

1  2  3  
adb shell su -c "mount -o remount,rw ext4 /system"  adb shell su -c "mv /system/etc/install-recovery.sh /system/etc/install-recovery.sh.bak"  adb shell su -c "mount -o remount,ro ext4 /system"

cm10-1-07

==

ここから先はfastbootコマンドで行います。

Factory Cableがある場合はシャットダウン後、Factory Cableを接続して"fastboot"で起動、

Factory Cableがない場合は、以下のコマンドを入力して"fastboot"で起動させます。

この方法はXDAフォーラムとは異なります。


私は"fastboot"コマンドが正しく動作するか確認したかったので、まず"fastboot"で起動させました。

フォーラムに載っている方法は、Kindleの電源を落として、パソコンと接続していない状態から

最初の"fastboot"コマンドをコマンドプロンプトから発行します。

コマンドプロンプトには<waitng for device>が表示され待機状態になります。

この状態でKindleとパソコンと接続すると、

Kindleが"Fastboot"状態で起動し、待機中の発行したコマンドが実行されます。

"Fastboot"状態は維持されますので、次の"fastboot"コマンドを順次発行と記載されています。

1  
adb shell su -c "reboot bootloader"

cm10-1-08

再起動後、画面に"Fastboot"の文字が表示されます。

cm10-1-13

fastbootコマンドが正常に動作するかを確認するには、以下のコマンドを入力します。

1  
fastboot -i 0x1949 getvar product

"product: Tate-PVT-08″のような返答があると正常に動作しています。

コマンドを発行しているにもかかわらず、<waitng for device>から表示が変わらない場合、

ドライバーが正常にインストールされていません。

cm10-1-04

現在のAndroidOSのバージョンが7.3.0以上の場合、

ダウンロードした"kfhd7-u-boot-prod-7.2.3.bin"でブートローダ領域を書き換えます。

実際のコマンドは以下のようになります。※パソコン側のフォルダは環境にあわせて変更してください。

1  
fastboot -i 0x1949 flash bootloader C:\android-sdk-windows\Rom\CM10.1\kfhd7-u-boot-prod-7.2.3.bin

cm10-1-09

ダウンロードした"kfhd7-freedom-boot-7.3.0.img"でブート領域を書き換えます。

実際のコマンドは以下のようになります。※パソコン側のフォルダは環境にあわせて変更してください。

1  
fastboot -i 0x1949 flash boot C:\android-sdk-windows\Rom\CM10.1\kfhd7-freedom-boot-7.3.0.img

cm10-1-10

ダウンロードした"kfhd7-twrp-2.4.4.0-recovery.img"でリカバリー領域をTWRPに書き換えます。

実際のコマンドは以下のようになります。※パソコン側のフォルダは環境にあわせて変更してください。

1  
fastboot -i 0x1949 flash recovery C:\android-sdk-windows\Rom\CM10.1\kfhd7-twrp-2.4.4.0-recovery.img

cm10-1-11

再起動します。

実際のコマンドは以下のようになります。

1  
fastboot -i 0x1949 reboot

cm10-1-12

再起動中、[Kindle Fire]の"Fire"の色が最初はオレンジに光り、

cm10-1-14

次にブルーに光ります。

cm10-1-15

このまま何も操作をしないと再度オレンジ色になり、通常起動します。

cm10-1-16

cm10-1-17

"Fire"の色がブルーに光っている時、ボリュームアップのボタンが押されていると、

リカバリーツールのTWRPが起動します。

cm10-1-18

cm10-1-19

このTWRPを利用してカスタムROMをインストールします。

XDAのフォーラムから対象ファイルのダウンロードを行います。

今回ダウンロードしたのは

2013/04/22リリース[ALPHA CM10.1 + 3.0.50+ KERNEL]版の

"cm-10.1-20130422a-UNOFFICIAL-tate.zip"ファイルと

Google Apps(2013/03/01版)の"gapps-jb-20130301-signed.zip"ファイルです。

このROMはCyanogenModオフィシャル版ではありません。

現時点ではKindle Fire HD用でオフィシャル版のCM10.1はリリースされていません。

cm10-1-inst-18

ダウンロードしたファイルはKindleの"Internal Storage"内にある適当なフォルダへコピーします。

今回は"Download"フォルダにコピーしました。

TWRPを起動します。

現在使用しているKindle Fire HDのOSが、Amazonのストックロム(バージョン7.3.1)なのでクリアーします。

"Wipe"をタップします。

cm10-1-inst-01

"Cache"、"Dalvik Cache"、"Factory Reset"、"System"をWipeします。

"Cache"をタップします。

cm10-1-inst-02

"Swipe To Wipe"の矢印を右にスワイプします。

cm10-1-inst-03

"Cache"の"Wipe"が実行されます。"

Back"をタップし、他の"Dalvik Cache"、"Factory Reset"、"System"を"同じ手順でWipeします。

cm10-1-inst-04

インストールを行います。

"Install"をタップします。

cm10-1-inst-05

ダウンロードファイルをコピーしたKindleのフォルダに移動します。

コピーしたファイルが確認できます。

まず、"cm-10.1-20130422a-UNOFFICIAL-tate.zip"を指定します。

cm10-1-inst-06

"Swipe To Confirm Flash"の矢印を右にスワイプして、インストールを実行します。

cm10-1-inst-07

インストール完了後、"戻る"をタップします。

"Add More Zips"をタップして複数ファイルを一回の作業でインストールできますが、

今回は個別にインストールを行っています。

cm10-1-inst-09

次に、"gapps-jb-20130301-signed.zip"を指定します。

cm10-1-inst-10

"Swipe To Confirm Flash"の矢印を右にスワイプして、インストールを実行します。

cm10-1-inst-11

インストール完了後、"Reboot System"をタップします。

cm10-1-inst-12

CyanogenModが起動します。

cm10-1-inst-13

起動後、画面に従い初期設定を行います。

これは通常のAndroidの初期設定と同じです。

cm10-1-inst-14

"Nexus 7″と同じアカウントを指定して復元を行いました。

設定やアプリなどが同期されます。

cm10-1-inst-15

設定メニュー

cm10-1-inst-16

端末情報

Androidのバージョンは4.2.2です。