今回は、ListViewとAdapterクラスを組み合わせた、いろいろなパターンについてみていきます。
プログラムはListViewウィジェットを使って書かれていますが、これらはすべて、ListActivityを使って実現する事もできます。
BaseAdapterクラスを拡張してリスト項目のレイアウトを自由にカスタマイズする。
BaseAdapterは、ArrayAdapterクラスのスーパクラスです。
BaseAdapterを継承したクラスには、ArrayAdapterの他にもCursorAdapter, SimpleAdapter等があります。
BaseAdapterクラスは、他のAdapterクラスの基となるクラスです。
このBaseAdapterクラスを拡張して、独自のAdapterクラスを定義して、getViewメソッドをオーバライトすることで、 リスト項目のレイアウトを自由にカスタマイズする事ができます。
以下にその例を示します。
リスト10(ListViewSample6.java)
01 | package gudon.sample.ListView6; |
03 | import java.util.ArrayList; |
04 | import java.util.List; |
06 | import android.app.Activity; |
07 | import android.content.Context; |
08 | import android.os.Bundle; |
09 | import android.view.View; |
10 | import android.view.ViewGroup; |
11 | import android.widget.BaseAdapter; |
12 | import android.widget.LinearLayout; |
13 | import android.widget.ListView; |
14 | import android.widget.TextView; |
16 | public class ListViewSample6 extends Activity { |
18 | private class Person { |
22 | public Person(String name, int age) { |
27 | public String getName() { |
36 | private class ListPersonAdapter extends BaseAdapter { |
37 | private Context context; |
38 | private List<Person> list; |
40 | public ListPersonAdapter(Context context) { |
42 | this.context = context; |
43 | list = new ArrayList<Person>(); |
44 | list.add(new Person("本田 圭佑", 24)); |
45 | list.add(new Person("遠藤 保仁", 30)); |
46 | list.add(new Person("松井 大輔", 29)); |
50 | public int getCount() { |
55 | public Object getItem(int position) { |
57 | return list.get(position); |
61 | public long getItemId(int position) { |
66 | public View getView(int position, View convertView, ViewGroup parent) { |
67 | Person person = (Person) getItem(position); |
69 | LinearLayout layout = new LinearLayout(context); |
70 | layout.setOrientation(LinearLayout.VERTICAL); |
73 | TextView tvName = new TextView(context); |
74 | tvName.setText(person.getName()); |
75 | layout.addView(tvName); |
77 | TextView tvAge = new TextView(context); |
78 | tvAge.setText(String.format("%d 才", person.getAge())); |
79 | layout.addView(tvAge); |
86 | public void onCreate(Bundle savedInstanceState) { |
87 | super.onCreate(savedInstanceState); |
89 | ListView lv = new ListView(this); |
92 | lv.setAdapter(new ListPersonAdapter(this)); |
ListViewSample6クラスの内部クラスPerson(18行目)は、名前と年齢データを保持するクラスです。
BaseAdapterクラスを拡張して、Personクラス専用のAdapterクラスとなるListPersonAdapterクラス(36行目)を定義しています。
ListPersonAdapterクラスでは、getViewメソッドをオ−バーライトしています。
getViewメソッドの戻り値となるViewオブジェクトは、リスト項目を表示するViewオブジェクトとなります。
従って、このViewオブジェクトに独自のレイアウトを持つViewオブジェクトを指定すれば、独自のレイアウトを持つリスト項目の表示が可能になります。
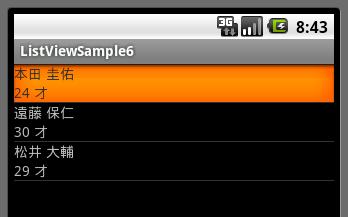
このgetViewメソッドでは、TextViewオブジェクトを2つ作成して、 変数positionが示す列位置にある、Personオブジェクトのnameフィールドとageフィールドの値を表示するように指定しています。
このプログラムを実行すると、以下のような画面が表示されます。

このプログラムには、実は欠点があります。
リスト項目を1列表示するたびに、毎回新しいウィジェットを作成しているので、リソースの無駄使いをしている事です。
このプログラムを、以下のように修正する事で、リスト項目のウィジェットを使い回す事ができるようになります。
リスト11(ListViewSample7.java)
001 | package gudon.sample.listView7; |
003 | import java.util.ArrayList; |
004 | import java.util.List; |
006 | import android.app.Activity; |
007 | import android.content.Context; |
008 | import android.os.Bundle; |
009 | import android.view.View; |
010 | import android.view.ViewGroup; |
011 | import android.widget.BaseAdapter; |
012 | import android.widget.LinearLayout; |
013 | import android.widget.ListView; |
014 | import android.widget.TextView; |
016 | public class ListViewSample7 extends Activity { |
018 | private class Person { |
022 | public Person(String name, int age) { |
027 | public String getName() { |
031 | public int getAge() { |
036 | private static class ViewHolder { |
041 | private class ListPersonAdapter extends BaseAdapter { |
042 | private Context context; |
043 | private List<Person> list; |
045 | public ListPersonAdapter(Context context) { |
047 | this.context = context; |
048 | list = new ArrayList<Person>(); |
049 | list.add(new Person("本田 圭佑", 24)); |
050 | list.add(new Person("遠藤 保仁", 30)); |
051 | list.add(new Person("松井 大輔", 29)); |
055 | public int getCount() { |
060 | public Object getItem(int position) { |
062 | return list.get(position); |
066 | public long getItemId(int position) { |
071 | public View getView(int position, View convertView, ViewGroup parent) { |
072 | Person person = (Person) getItem(position); |
075 | if (convertView == null) { |
076 | LinearLayout layout = new LinearLayout(context); |
077 | layout.setOrientation(LinearLayout.VERTICAL); |
078 | convertView = layout; |
080 | holder = new ViewHolder(); |
081 | holder.tvName = new TextView(context); |
082 | holder.tvAge = new TextView(context); |
083 | layout.addView(holder.tvName); |
084 | layout.addView(holder.tvAge); |
086 | convertView.setTag(holder); |
088 | holder = (ViewHolder) convertView.getTag(); |
090 | holder.tvName.setText(person.getName()); |
091 | holder.tvAge.setText(String.format("%d 才", person.getAge())); |
098 | public void onCreate(Bundle savedInstanceState) { |
099 | super.onCreate(savedInstanceState); |
101 | ListView lv = new ListView(this); |
104 | lv.setAdapter(new ListPersonAdapter(this)); |
修正したgetViewメソッド内の処理をみていきます。
getViewメソッドの第2引数convertViewには、前回使用したViewオブジェクトが渡されます。
もし、このオブジェクトがnullの場合、まだViewオブジェクトは作成されていません。
このため、convertViewがnullの場合は新しいViewオブジェクトを作成します。
そして、このViewオブジェクト内に配置される子ウィジェットを作成し、 その子ウィジェットの参照を格納するために、 独自に定義(36行目)したクラスViewHolderを作成して子ウィジェットの参照を格納します。
このViewHolderオブジェクトを、convertViewのTagに格納します。
Tagは、Viewオブジェクトで自由に使えるデータを保存するポケットのようなもののようです。
convertViewがnullでない場合には、既にViewオブジェクトは作成済みですので、 このViewオブジェクトすなわちconvertViewより、子ウィジェットの参照を保持しているViewHolderをTagより取得します。
新たに、オブジェクトを作成する必要はありません。
その後は、各子ウィジェットに対しての処理をおこないます。
getViewメソッドでレイアウトファイルを使う
getViewメソッドで作成するViewに、レイアウトファイルを使う事もできます。
以下にその例を示します。
リスト12(1)-レイアウトファイル(list_row.xml)
01 | <?xml version="1.0" encoding="utf-8"?> |
04 | android:orientation="vertical" |
05 | android:layout_width="fill_parent" |
06 | android:layout_height="wrap_content"> |
08 | android:id="@+id/person_name" |
09 | android:layout_width="fill_parent" |
10 | android:layout_height="wrap_content" |
13 | android:id="@+id/person_age" |
14 | android:layout_width="fill_parent" |
15 | android:layout_height="wrap_content" |
リスト12(2)-Javaソースの修正部分のみ(ListViewSample7.java)
71 | public View getView(int position, View convertView, ViewGroup parent) { |
72 | Person person = (Person) getItem(position); |
75 | if (convertView == null) { |
76 | LayoutInflater inflater = LayoutInflater.from(context); |
77 | convertView = inflater.inflate(R.layout.list_row, null); |
79 | holder = new ViewHolder(); |
80 | holder.tvName = (TextView) convertView |
81 | .findViewById(R.id.person_name); |
82 | holder.tvAge = (TextView) convertView |
83 | .findViewById(R.id.person_age); |
85 | convertView.setTag(holder); |
87 | holder = (ViewHolder) convertView.getTag(); |
89 | holder.tvName.setText(person.getName()); |
90 | holder.tvAge.setText(String.format("%d 才", person.getAge())); |
リスト11内のgetViewメソッドを、リスト12(2)のように修正します。
76,77行目でインフレータを使って、Viewオブジェクトを取得しています。
選択不可のリスト項目を指定する。 - BaseAdapterのisEnabledメソッド
BaseAdapterクラスのisEnabledメソッドをオーバライトすると、選択不可のリスト項目を指定する事ができます。
リスト11において、ListPersonAdapterクラスにisEnabledメソッドをオーバライトして、 以下のコードをを挿入すると、2番目のリスト項目(position = 1)が選択できなくなります。
リスト13(ListViewSample7.java)
2 | public boolean isEnabled(int position) { |
ArrayAdapterクラスを拡張する。
ArrayAdapterクラスもBaseAdapterを継承しているので、getViewメソッドを使ってレイアウトを自由にカスタマイズする事ができます。
ここでは、「謎めいたインテント」の「アクションを使って他のアプリケーションのコンポーネントを呼び出す。」の項で紹介した、 「インテントプログラム1」と 同じような機能を、 ListViewとArrayAdapterクラスを拡張したクラスを使って実現してみます。
リスト14(1)-レイアウトファイル(list_row.xml)
01 | <?xml version="1.0" encoding="utf-8"?> |
04 | android:layout_width="fill_parent" |
05 | android:layout_height="wrap_content"> |
07 | android:id="@+id/text" |
08 | android:layout_width="wrap_content" |
09 | android:layout_height="wrap_content" |
12 | android:id="@+id/button" |
14 | android:layout_alignParentRight="true" |
15 | android:layout_width="wrap_content" |
16 | android:layout_height="wrap_content" |
リスト14(2)-Javaソース(ListViewSample8.java)
01 | package gudon.sample.ListView8; |
03 | import android.app.Activity; |
04 | import android.content.Context; |
05 | import android.content.Intent; |
06 | import android.net.Uri; |
07 | import android.os.Bundle; |
08 | import android.view.LayoutInflater; |
09 | import android.view.View; |
10 | import android.view.ViewGroup; |
11 | import android.widget.ArrayAdapter; |
12 | import android.widget.Button; |
13 | import android.widget.ListView; |
14 | import android.widget.TextView; |
16 | public class ListViewSample8 extends Activity { |
18 | private class IntentItem { |
20 | private String buttonText; |
21 | private Intent intent; |
23 | private IntentItem(String title, String buttonText, String action, |
26 | this.buttonText = buttonText; |
27 | this.intent = new Intent(action, Uri.parse(uriString)); |
31 | private class IntentItemArrayAdapter extends ArrayAdapter<IntentItem> { |
32 | private int resourceId; |
34 | public IntentItemArrayAdapter(Context context, int resourceId) { |
35 | super(context, resourceId); |
36 | this.resourceId = resourceId; |
40 | public View getView(int position, View convertView, ViewGroup parent) { |
41 | final IntentItem intentItem = (IntentItem) getItem(position); |
42 | if (convertView == null) { |
43 | LayoutInflater inflater = (LayoutInflater) getContext() |
44 | .getSystemService(Context.LAYOUT_INFLATER_SERVICE); |
45 | convertView = inflater.inflate(resourceId, null); |
47 | TextView tv = (TextView) convertView.findViewById(R.id.text); |
48 | tv.setText(intentItem.title); |
49 | Button button = (Button) convertView.findViewById(R.id.button); |
50 | button.setText(intentItem.buttonText); |
51 | button.setOnClickListener(new View.OnClickListener() { |
54 | public void onClick(View view) { |
55 | startActivity(intentItem.intent); |
63 | public void onCreate(Bundle savedInstanceState) { |
64 | super.onCreate(savedInstanceState); |
66 | ListView lv = new ListView(this); |
69 | ArrayAdapter<IntentItem> adapter = new IntentItemArrayAdapter(this, |
71 | adapter.add(new IntentItem("愚鈍人", "サイトを表示", Intent.ACTION_VIEW, |
73 | adapter.add(new IntentItem("行田市", "地図を表示", Intent.ACTION_VIEW, |
75 | adapter.add(new IntentItem("DIAL", "12345678をDIAL", Intent.ACTION_DIAL, |
77 | lv.setAdapter(adapter); |
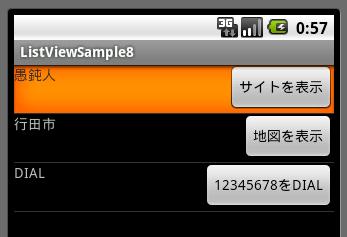
このプログラムを実行すると、以下の図のようにリスト表示項目に、TextViewウィジェットとButtonウィジェットが表示されます。

各リスト項目のボタンをクリックすると、「インテントプログラム1」を実行した時と同じように、 Webブラウザや地図表示等のあらかじめアンドロイドに用意されているアプリケーションが呼び出されます。
リスト14(2)のコードをみていきます。
31行目のIntentItemArrayAdapterクラスは、ArrayAdapterクラスを拡張したクラスです。
IntentItemArrayAdapterクラスは、IntentItemオブジェクト(18行目で定義)のリストを内部に持ちます
IntentItemオブジェクトは、ListViewのリスト項目の情報を保持しています。
IntentItemクラスのtitleフィールドとbuttonTextフィールドは、それぞれリスト14(1)のレイアウトファイルに記述されている、 TextViewウィジェットとButtonウィジェットに表示される文字列が格納されます。
intentフィールドには、ボタンが押された時に実行されるインテントが格納されます。
インテントについては、「謎めいたインテント」を参照して下さい。
IntentItemArrayAdapterクラスでは、getViewメソッドをオーバライトして、リスト項目を表示するためのViewオブジェクトを操作しています。
convertView引数がNullの場合は、レイアウトファイルよりViewオブジェクトを取得しています(45行目)。
47行目〜57行目で、TextViewウィジェットとButtonウィジェットの表示文字列と、Buttonのイベントリスナーを設定しています。
69行目〜76行目で、リスト項目であるIntentItemオブジェクトを作成して、これをAdapterオブジェクトに追加しています。
SimpleAdapterクラス-もっと簡単にレイアウトをカスタマイズ
SimpleAdapterクラスを使うと、 Adapterクラスを拡張したクラスを定義してgetViewメソッドをオーバライトしなくても、 Mapクラスを使って、もっと簡単にリスト項目のレイアウトをカスタマイズする事ができます。
前項と同じく、Webブラウザや地図表示等のインテントの実行を、 今度はボタンではなくリスト項目がクリックされた時におこなうプログラムを、SimpleAdapterクラスを使って実装してみます。
リスト15(1)-レイアウトファイル(list_row.xml)
01 | <?xml version="1.0" encoding="utf-8"?> |
03 | android:orientation="vertical" |
04 | android:layout_width="fill_parent" |
05 | android:layout_height="fill_parent" |
08 | android:id="@+id/title" |
09 | android:layout_width="fill_parent" |
10 | android:layout_height="wrap_content" |
11 | android:textSize="15sp" |
14 | android:id="@+id/subtitle" |
15 | android:layout_width="fill_parent" |
16 | android:layout_height="wrap_content" |
17 | android:textSize="10sp" |
リスト15(2)-Javaソース(ListViewSample9.java)
01 | package gudon.sample.listView9; |
03 | import java.util.ArrayList; |
04 | import java.util.HashMap; |
05 | import java.util.List; |
08 | import android.app.Activity; |
09 | import android.content.Intent; |
10 | import android.net.Uri; |
11 | import android.os.Bundle; |
12 | import android.view.View; |
13 | import android.widget.AdapterView; |
14 | import android.widget.ListView; |
15 | import android.widget.SimpleAdapter; |
17 | public class ListViewSample9 extends Activity { |
20 | public void onCreate(Bundle savedInstanceState) { |
21 | super.onCreate(savedInstanceState); |
23 | ListView lv = new ListView(this); |
26 | List<HashMap<String, Object>> myData = new ArrayList<HashMap<String, Object>>(); |
27 | Map<String, Object> map; |
29 | map = new HashMap<String, Object>(); |
30 | map.put("title", "愚鈍人"); |
31 | map.put("subtitle", "愚鈍人サイトを表示"); |
32 | map.put("intent", getIntent(Intent.ACTION_VIEW, |
34 | myData.add((HashMap<String, Object>) map); |
36 | map = new HashMap<String, Object>(); |
37 | map.put("title", "地図"); |
38 | map.put("subtitle", "行田市の地図を表示"); |
39 | map.put("intent", getIntent(Intent.ACTION_VIEW, "geo:36.2,139.5")); |
40 | myData.add((HashMap<String, Object>) map); |
42 | map = new HashMap<String, Object>(); |
43 | map.put("title", "DIAL"); |
44 | map.put("subtitle", "DIAL12345678を表示"); |
45 | map.put("intent", getIntent(Intent.ACTION_DIAL, "tel:12345678")); |
46 | myData.add((HashMap<String, Object>) map); |
48 | SimpleAdapter adapter = new SimpleAdapter(this, myData, |
49 | R.layout.list_row, new String[] { "title", "subtitle" }, |
50 | new int[] { R.id.title, R.id.subtitle }); |
51 | lv.setAdapter(adapter); |
53 | lv.setOnItemClickListener(new AdapterView.OnItemClickListener() { |
56 | public void onItemClick(AdapterView<?> parent, View view, |
57 | int position, long id) { |
58 | ListView listView = (ListView) parent; |
59 | Map<String, Object> map = (Map<String, Object>) listView |
60 | .getItemAtPosition(position); |
62 | Intent intent = (Intent) map.get("intent"); |
63 | startActivity(intent); |
68 | private Intent getIntent(String action, String uriString) { |
69 | return new Intent(action, Uri.parse(uriString)); |
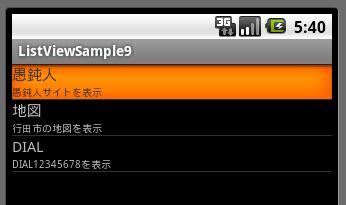
このプログラムを実行すると、以下の画面が表示されます。

リスト項目をクリックすると、インテントが実行されます。
Mapのキーに指定した値が、レイアウトファイルのウィジェットのIDと一致していると、Mapの値がウィジェットに表示されるのがわかります。
SimpleCursorAdapterクラス-コンテンツプロパイダーよりデータを取得してリスト表示する。
SimpleCursorAdapterクラスを使うと、コンテンツプロパイダーよりデータを取得して、「連絡先」などの情報を簡単に、リスト表示させる事ができます。
以下に、そのプログラムの例を示します。
リスト16(1)-Javaソース(ListViewSample10.java)
01 | package gudon.sample.listView10; |
03 | import android.app.Activity; |
04 | import android.database.Cursor; |
05 | import android.os.Bundle; |
06 | import android.provider.ContactsContract.CommonDataKinds.Phone; |
07 | import android.widget.ListAdapter; |
08 | import android.widget.ListView; |
09 | import android.widget.SimpleCursorAdapter; |
11 | public class ListViewSample10 extends Activity { |
14 | protected void onCreate(Bundle savedInstanceState) { |
15 | super.onCreate(savedInstanceState); |
17 | Cursor c = getContentResolver().query(Phone.CONTENT_URI, null, null,null, null); |
18 | startManagingCursor(c); |
20 | ListAdapter adapter = new SimpleCursorAdapter(this, |
21 | android.R.layout.simple_list_item_2, c, |
22 | new String[] { Phone.DISPLAY_NAME, Phone.NUMBER }, |
23 | new int[] { android.R.id.text1, android.R.id.text2 }); |
25 | ListView lv=new ListView(this); |
26 | lv.setAdapter(adapter); |
21行目の「android.R.layout.simple_list_item_2」は、アンドロイドにあらかじめ定義されているレイアウトのIDです。
コンテンツプロパイダーよりデータを取得するためには、マニュフェストファイルの修正も必要です。
リスト16(2)-マニュフェストファイル(AndroidManifest.xml)
01 | <?xml version="1.0" encoding="utf-8"?> |
03 | package="gudon.sample.listView10" |
04 | android:versionCode="1" |
05 | android:versionName="1.0"> |
06 | <application android:icon="@drawable/icon" android:label="@string/app_name"> |
07 | <activity android:name=".ListViewSample10" |
08 | android:label="@string/app_name"> |
10 | <action android:name="android.intent.action.MAIN" /> |
11 | <category android:name="android.intent.category.LAUNCHER" /> |
15 | <uses-sdk android:minSdkVersion="7" /> |
16 | <uses-permission android:name="android.permission.CALL_PHONE" /> |
17 | <uses-permission android:name="android.permission.READ_CONTACTS" /> |
ArrayAdapterクラスとリソース
配列データをリソースファイルに定義して、そのリソースファイルからArrayAdapterオブジェクトを生成する事がでます。
以下は、そのサンプルを示します。
リスト17(1)-配列データのリソースファイル(res/values/arrays.xml)
01 | <?xml version="1.0" encoding="utf-8"?> |
03 | <string-array name="planets"> |
リスト17(2)-Javaソース(ListViewSample11.java)
01 | package google.sample.listView11; |
03 | import android.app.Activity; |
04 | import android.os.Bundle; |
05 | import android.widget.ArrayAdapter; |
06 | import android.widget.ListView; |
08 | public class ListViewSample11 extends Activity { |
09 | /** Called when the activity is first created. */ |
11 | public void onCreate(Bundle savedInstanceState) { |
12 | super.onCreate(savedInstanceState); |
13 | setContentView(R.layout.main); |
14 | super.onCreate(savedInstanceState); |
16 | ListView lv = new ListView(this); |
19 | ArrayAdapter<CharSequence> adapter = ArrayAdapter.createFromResource( |
20 | this, R.array.planets, android.R.layout.simple_list_item_1); |
22 | lv.setAdapter(adapter); |
更に、レイアウトファイルのListViewウィジェットの属性に配列データのリソースファイルを指定する事ができます。
リスト15(1)-レイアウトファイル(list_row.xml)
01 | <?xml version="1.0" encoding="utf-8"?> |
03 | android:orientation="vertical" |
04 | android:layout_width="fill_parent" |
05 | android:layout_height="fill_parent" |
08 | android:id="@+id/list" |
09 | android:layout_width="fill_parent" |
10 | android:layout_height="wrap_content" |
11 | android:entries="@array/planets" |
リスト15(2)-Javaソース(ListViewSample12.java)
01 | package gudon.sample.listView12; |
03 | import android.app.Activity; |
04 | import android.os.Bundle; |
06 | public class ListViewSample12 extends Activity { |
09 | public void onCreate(Bundle savedInstanceState) { |
10 | super.onCreate(savedInstanceState); |
11 | setContentView(R.layout.main); |
プロジェクト作成時のJavaソースから、いっさい手を加えずにListViewの表示ができました。
参考URL
「ListViewとListActivity」に関連する参考URLを以下に示します。


0 件のコメント:
コメントを投稿