One of the main issues when dealing when embedded systems -specially as an amateur developer- is understanding what happens since our board/tablet/phone/etc (we will refer to is as a device from now on) is powered on, until the OS takes control of the device and we are able to use it. Understanding this chain of events is crucial in order to develop low-level routines for any given embedded platform, and equally necessary for efficiently design high-level Apps.
Before getting into the boot sequence itself, we are going to say something about how the code is executed before reaching the root files system, this is, how the low partition table is organize, and how it is different from "normal partitions" recognized by the OS (and any other disk utility such as the one present in Ubuntu or Mac OS).
Low Partition Table (raw) and Normal Partition Table
One of the main issues -at least it was for me- is how to understand how code starts being executed once we press ON in our board/tablet/phone/etc. How does the CPU know which code to execute first? Where is that code? How is it possible that this code is found without even counting on a partition table as such, and even without an MBR? This, I will try to explain here.
Normally, in a boot device, the block 0 contains the Master Boot Record (MBR). This special sector (boot sector) contains information about how the device is partitioned in a structure commonly referred as thepartition table. In this way, anytime the SO needs anything knows where to start looking for it. However, when starting up the system for the first time we do it, with a blank device without MBR or partitions, even then, there are some things we can do.
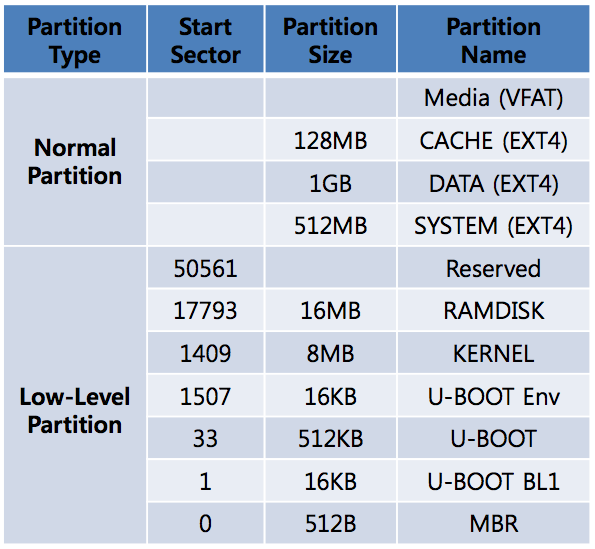
Once the a device is powered on it starts code from a know location (ROM) and looks for the first stage bootloader in a specific block. After doing some initializations, this first bootloader points to a second stage bootloader, which is placed in another well-known location. This process of "pointing" is sometimes referred as Low Partition Table or Raw Partition. This is, there is no partition as such, but the code knows where to continue, since it is hard-coded where it has to look for things. If the ROM expects to find a bootloader in sector 1 and it is not, it stops its operation, otherwise it executes the code present there and continues. Normally in embedded systems (such as Android) the images of the RAMDisk and the Kernel are located in known positions outside the partition table, so that they can be loaded into the DRAM when the system boots up. These images are generated when compiling the kernel and Android itself.
The main advantage of this is that only with a bootloader, in our booting device -which we can copy ourselves there simply by using dd if dealing with a USB stick or an SD card- we can access a basic terminal with very useful commands such as fdisk or fastboot. (We will discuss how to deal with SD Cards (it is exactly the same for USB sticks) when using them as boot devices). By using these commands we can create the MBR and the partition table (fdisk) and upload the images of the kernel, the ramdisk or the system (fastboot) in a more friendly and faster way than "manually" copying them using dd.
Here we have an example of the hardkernel's ODROID-A4 partitions, both raw and normal (www.hardkernel.com):
Power On – ROM
When a system is first booted, the processor -as explained before- executes code place in a well-known location. In embedded systems, this location usually is an internal ROM that initializes some of the components in the board and finds a device to boot up from (in some platforms this small piece of code is referred as BL0)- it varies from board to board and from CPU to CPU also. In the case of a PC, this task is carried out by the BIOS, which is way more flexible in terms of choosing a device to boot up from, component configuration, etc. In either case, the result is the same and the system attempts to boot up.
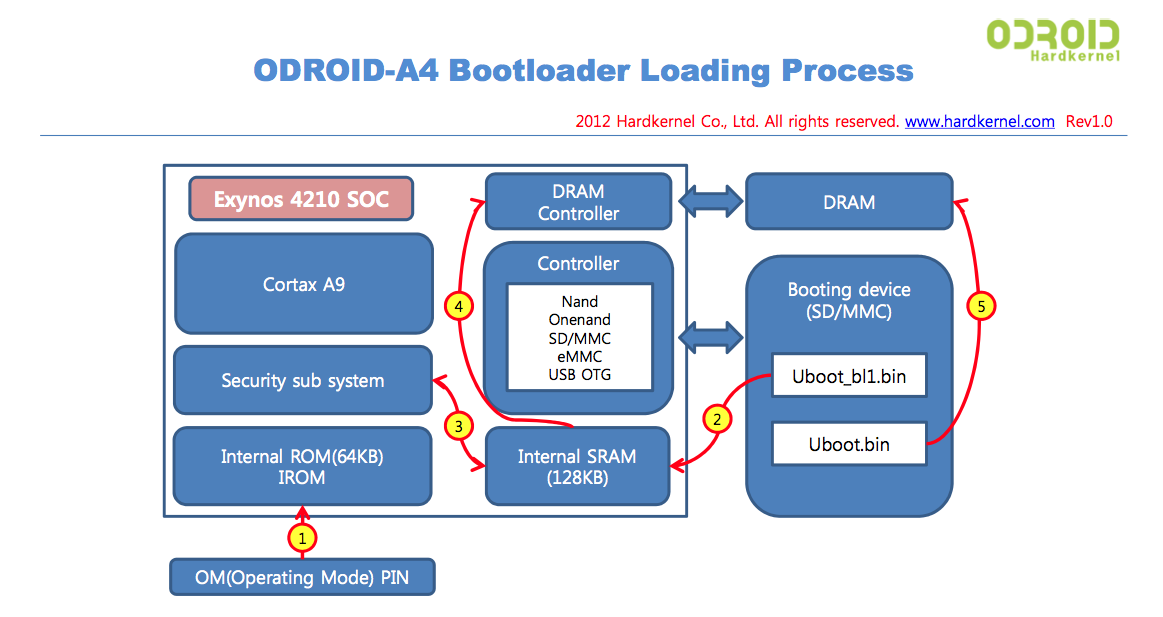
If a device is eligible for booting up – this means, a first stage bootloader is found (referred as BL1, continuing with the convention started above)- the BL1 is copied intro an internal RAM, being responsible for setting up clocks, SDRAM and loading the remaining boot loader (BL2) into it. Once again this process varies from board to board, but we can assume that they all do something very similar, being the ultimate goal the same for all of them – placing the second stage bootloader (BL2) in DRAM and running it.
Here we have an example of the hardkernel's ODROID-A4 Bootloader Loading Process (www.hardkernel.com):
The Kernel
The bootloader (now referring to it as a whole, BL0 + BL1 + BL2) once it has initialized all the components in the board, loads into RAM -from a well-know location- a more complex software, known as the kernel. The kernel, which has been specifically cross-compiled for our board (CPU, Memory and Components), is responsible for managing the system's resources, being the "bridge" between the hardware and the software. When the kernel is decompressed, it loads and start several processes, creating a low-level layer for supporting the root file system (Android in our case). This task is carried out by what is known as the Init Sequence (init.rc).
One remarkable thing here is that since the kernel know the hardware, and has to communicate with it, not only does it need to be cross-compile depending on the platform itself, but it is specific for each board. This implies and added complexity, given that not every kernel will be able to be loaded in every board – as it tends to happen with PCs, where there is a set of standard drivers that are compatible with most hardware, from CPUs to Graphic controllers. For example, if we want to change the kernel in a Samsung Galaxy III, we need to know that it comes with a Exynos 4412 , which is an ARM Quad Cortex-9 processor. With this knowledge we know the capabilities of our processor and the target platform to cross-compile, however, we lack details concerning the board as such, this means the schematics of the Samsung Galaxy III. Since our intention is merely development (not hacking), we can access what is called development boards -such as the ones provided by hardkernel (ODROID), which are very close to Samsung's and open source. Counting on information concerning the used components (FLASH and RAM chips, Etherner controller, etc), it is possible to create configuration files for a kernel to match a specific target platform. Unfortunately this changes in the kernel are very specific on the kernel version, being normally the case that we are tied to a very few versions of the kernel when dealing with a given board. It is common all these changes made in the kernel (version x) are group under a patch, which can be apply to an official kernel (version x) so that it is compatible with our board. (A future post will comment on how to patch a kernel).
Dalvik VM and Zygote
Normally, one of the last steps of the init sequence is to load the root file system and the OS, which is in itself the very last step before us -or our code- taking over control of the board/device/machine. Nonetheless, Android does not run directly on top of the kernel since it has been coded in Java and therefore needs to be run on top of a Virtual Machine – Java being marketed as "write once, run anywhere".
The VM Android runs on top of is called Dalvik (Google decided to abandon both JME and JVM), in a move from traditionally favored stack-based VM architectures to register-based ones. One of the main reasons for this favoritism was mostly due to simplicity of VM implementation, ease of writing a compiler back-end (most VMs are originally designed to host a single language and code density (i.e., executables for stack architectures are invariably smaller than executables for register architectures) [1].
Since every application counts on its own instance of the VM to run in, VM instances are required to start quickly when a new application is launched. Also the memory foot print of the VM is required to be minimal. In order to achieve this, Android introduced a concept called Zygote, in order to enable both sharing of code across VM instances and to provide fast startup time of new VM instances. The Zygote process initializes one Dalvik VM, which preloads and preinitializes code library classes. Once the Zygote has initialized, it will sit and wait for socket requests coming from the runtime process indicating that it should fork newVM instances based on the ZygoteVM instance. [2]
As Zygotes has to be run before Android core processes can be executed, it is launched by the kernel, as part of the init sequence, already in the user space.
Root File System – ANDROID
Finally, Android code starts being executed: volume demons, libraries, the activity manager, core applications, etc., leading to the launching of the graphical interface.
Further explanation concerning processes running on the Dalvik VM and Android Apps. is beyond the scope of this tutorial.
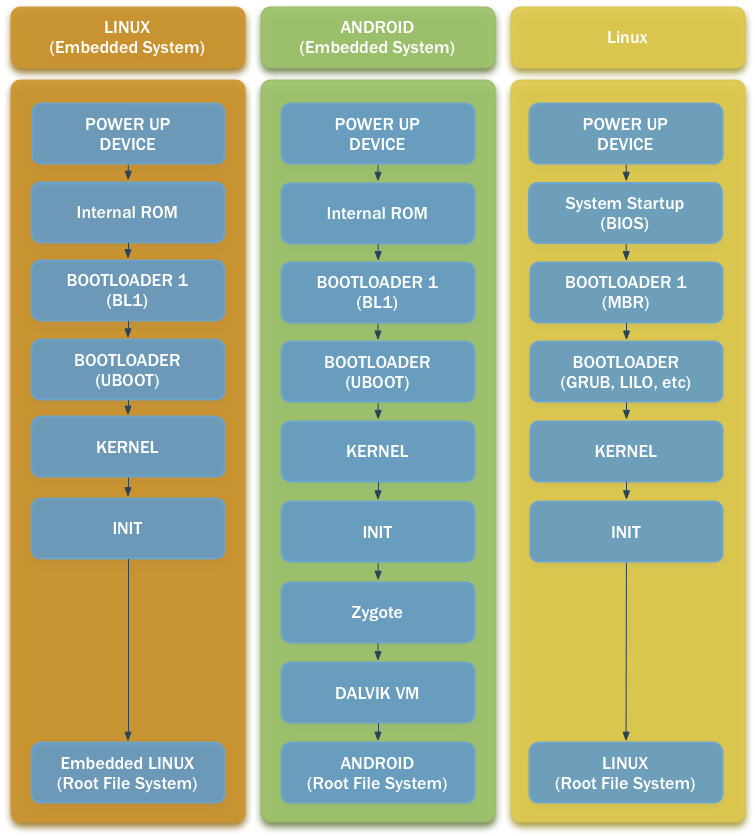
Finally, and as a visual aid for understanding what we have discussed here, we have a simplified flow diagram comparison of the different boot sequences of a device running Linux (left), a device running Android (middle) and a PC running Linux.
REFERENCES
[1] Register vs. stack based VMs. Derek Jones. September, 2009. (here)
[2] The Dalvik Virtual Machine Architecture, David Ehringer. March, 2010. (here)
[3] Android Zygote Startup. (here)
[4] Hardkernel – ODROID (here)
[5] Samsung Exynos 4 (here)
[6] The Linux Kernel Archives (here)
[7] ARM – Cortex-A9 Processor (here)
I hope the post has been helpful and clarifying :)
http://javigon.com/2012/08/24/from-poweron-to-android-the-boot-sequence/

